
Table of Contents
Chapter One: Welcome to Duplicate Zapper
Chapter Two: Scanning and Zapping
Chapter Three: Preferences
Chapter Four: Updates
Chapter Five: Support
One: Welcome to Duplicate Zapper
About
Intego's Duplicate Zapper helps you locate duplicate copies of files and folders on your Mac. Removing these duplicate files is a good way to free up disk space and increase system performance. Duplicate Zapper can find all duplicate files on your Mac and does so by scanning based on the file content, not just a file name or timestamp. It will never scan important system or application files, ensuring your Mac stays safe and continues to work as expected.
Features
Duplicate Zapper contains everything you need to manage the duplicate files on your Mac more efficiently:
- Searches your Mac based on file contents, not just name or date, finding all true duplicates
- Scan through thousands of files without any performance impact
- Customize your search to local folders or external volumes based on your scanning preferences
- Auto Select options make it easier to manage and review your duplicates
- Sort by file options for quick and easy viewing of duplicates
- Delete files the way you want: delete to Trash, delete completely, or secure delete to provide the level of security you are looking for
- Avoids system-critical and application-critical files to avoid potential issues
- Intuitive user interface means it's easy enough for anyone to use it
System Requirements
Mac OS X 10.7 or higher
Mac computer with 64-bit processor
1.5 GB Free Disk Space
Blueprints
Duplicate Zapper comes with an intuitive user interface that makes it easy to understand and use. However, if you find yourself needing some guidance about how to use the application, you may find Blueprints useful. Blueprints are overlays that explain what each clickable slider and button does. Accessing Blueprints is a great way to get quick help if you are looking for additional information about what you are seeing in the current window. Click the 'i' icon in the upper right corner of the window to view its Blueprint.

Need more information? You can also place your arrow cursor under any slider switch in Duplicate Zapper and you will see the ![]() icon. You can click the icon for more information about each duplicate type.
icon. You can click the icon for more information about each duplicate type.
Two: Scanning and Zapping
The first screen you will be presented with when launching the application is a Duplicate Types window which allows you to pick and choose which categories of files you would like to scan for. By default Duplicate Zapper will search for all of the available categories, but you can customize your search by toggling any of the category sliders to the On/Off position.
Duplicate Types

You can scan for Duplicates by any of the following categories:
Folders - Scan folders which may contain other files and folders with duplicates
Archives - Archive files combine several other files and they are most commonly used as backups. File formats include: .ZIP, .TAR, .DMG, .TGZ, and .CPGZ
Movies - Any file formats that include videos and movies. File formats include: .M4A, .M4V, .MOV, and .WMV
Documents - Spreadsheets, text files, presentations, and other documents. .CSV, .DOC, .DOCX, .KEYNOTE, .NUMBERS, .PAGES, .TXT, .XLS and many more
Music - All sound and music file formats. File formats include: .AIFF, .MOV, .MP2, .MP3, .MP4, .SPX and .WAV
Pictures - Image and picture files including formats: .BMP, .GIF, .ICNS, .ICO, .JPG, .JPEG, .PNG, .PSD, .RAW, .TIF, and .TIFF
Including and Excluding Locations
After you have selected the categories of files you wish to search for, click the green 'Continue' button at the top of the window. You will be presented with a new window that lets you choose what areas of your computer you want to scan. You can drag and drop folders or drives into this window to include or exclude them from the current scan, or click the '+' or '-' buttons in each area to add or remove items from the list. For example: You might want to include only your internal or external hard drive. You also may want to exclude a specific folder from being scanned that may contain duplicates that you intend to keep (such as work documents). Excluding certain locations can also speed up scan times.

After you have chosen which locations to scan, click the green 'Scan' button at the top of the window and Duplicate Zapper will begin analyzing your files and searching for duplicates. A progress bar will appear in the top right corner of the window. The scan button will also be animated to indicate that it is working.

The left side of this window provides tips and tricks for using the application and Mac OS X. On the right side, you can see specific information about the categories of files that have been scanned. Duplicate Zapper will indicate the progress for each category of files it is scanning.
Managing Duplicates
Once the scan is complete, you will be presented with a new window that will help you manage and delete the duplicate files you want to remove. The window below provides an example of what you may see after Duplicate Zapper has completed a scan. This window is separated into three columns to help you easily manage your duplicates with a comfortable workflow. These columns are: Categories, Files, and Duplicates. We've labeled these columns '1', '2', and '3' below, and we'll provide additional information on each section in this chapter.

1. Categories
Categories provides a list of all of the different types of duplicates the scan has found. You will also see the total number of duplicates found for each category listed here. You can choose to manage all of your duplicate files at once, or select a category from the list to handle them individually. The chosen category will be highlighted in green to indicate it has been selected. By default, 'All Duplicates' will be chosen.

2. Files
The Files column displays a list of all files associated within the chosen category. You can see the 'File Name' for each set of duplicates, and a 'Files' count that identifies how many duplicates the application has found for each particular duplicate file. The first number indicates the number of duplicates you have selected to delete, while the second number indicates the total number of duplicate files for this particular item found during the scan.
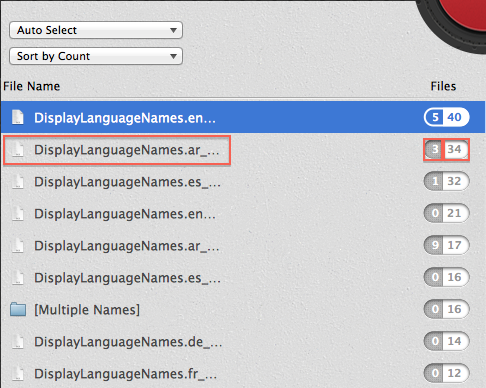
Auto Select
The Auto Select option can help you quickly manage your duplicate files by automatically selecting a set of files to delete based on certain criteria. By selecting any one of the options described below, Duplicate Zapper will automatically choose to keep all versions of the file that match these criteria, and the rest of the files will be selected for deletion.

Earliest Files - Keep files with the earliest creation date.
Latest Files - Keep the most recent version of files.
Shortest Path - Keep files with the shortest destination file path
Longest Path - Keep files with the longest destination file path
Originals - Keep the original version of all files. This is determined by file data such as the creation date.
Files on 'Specified Volume' - Keep files only on a specific drive or volume. Note: Each individual volume scanned will be listed here.
All Files - Keep all files. This option is helpful if you are trying to reset any changes you may have made.
Sort by Options
The 'Sort by...' option lets you modify the order of files presented for easy management. This can be very useful if you are trying to locate the duplicate files that are taking up the most space on your Mac, or a specific type of file or extension. You can sort files in the list by choosing from the following options:
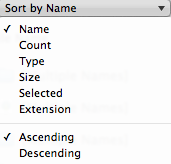
Name - Sort by file name
Count - Sort by the number of duplicates found
Type - Sort files into categories by type
Size - Sort from largest to smallest, or smallest to largest file size
Selected - Sort by files you have manually selected for deletion
Extension - Sort by file extension such as .txt or .zip
3. Duplicates
The Duplicates area lists the individual duplicate copies found by the scanner for the currently selected file. You can manually select which duplicate versions you wish to delete by selecting them from this list. Duplicate Zapper offers a couple of options here to help you determine which files you want to remove. Clicking the 'Show' icon will open a Finder window that will allow you to see the exact file location on your Mac. The 'Quick Look' option lets you quickly view a preview of the chosen file. This can be especially helpful if you are trying to determine what picture files you want to delete. Additionally, a smaller preview of the selected file will always be presented at the bottom of this area as seen in the example below.

You can also hover your arrow cursor over the Location of any file in this list to see the full file path displayed. This is faster than clicking 'Show'.

Zapping Files
Once you have made your decisions about which files you want to remove, click the red 'Zap' button located at the top of the window.

Each duplicate file to be deleted will have a check mark to the left of the 'Location' file path.

After you have clicked the 'Zap' button, a confirmation window will appear that displays what files are about to be deleted. At the top of this window you can see the total number of items included, and how much free space will be retrieved. Click the 'Delete' button after reviewing the files listed. You can also click 'Cancel' to return to the previous screen. If you do not want to see this confirmation window on future scans, just check the 'Don't show me this again' box in the bottom left corner.

A final 'Duplicates zapped!' window will appear once the clean operation has been completed. From here you can see how much data was just deleted, and how much free space you have saved with Duplicate Zapper since it has been installed. Click the 'Continue Zapping' button to return to the previous list of duplicate items, select the yellow 'Start Over' button at the top of screen to begin a new search, or simply close the window to quit the application if you are finished.

Three: Preferences
Most of Duplicate Zapper's features and functionality are configured directly through the main interface. However, there are a few settings and options that can be controlled from the Preferences window. You can reach these options by choosing 'Duplicate Zapper > Preferences...' from the top menu bar, or by pressing 'Command-Comma' on your keyboard.

The Preferences window is divided into two panes: General and Advanced
General

Help Overlays: You can reset the help overlays so that they reappear when you launch the application again. If you are looking for basic instructions while using the application, this may be useful.
Notifications: If you accidentally dismiss a notification and want to see it again, reset notifications by clicking this button.
Feedback:
- Subscribe: You can sign up to receive our newsletter by entering your e-mail address into this field and clicking the Subscribe button. You will receive special offers such as discounts for other Intego software and new product information. We take your privacy seriously, and we do not share or sell your information to third parties.
- Allow anonymous information to be collected: Intego software periodically collects information about how features are used to help improve their quality and reliability. All information collected is fully anonymous and cannot be used to personally identify any particular user or their behavior.
Advanced

Move zapped duplicates to trash: When this button is checked, Duplicate Zapper will move files to the Trash when they are "zapped". You can recover items from the Trash if you accidentally zap a file you did not intend to remove. This is the default behavior. You can uncheck this box to have Duplicate Zapper delete items permanently instead. If you choose to delete items permanently they will be unrecoverable.
Security: This feature allows you to securely delete data from your computer that has been marked for deletion. By choosing Basic, Medium or High, Duplicate Zapper will overwrite files with 1, 7 or 35 passes of random data before deleting them. Warning: Secure Cleaning may significantly increase deletion times. SSD drives are also not supported with this feature.
Four: Software Updates
Duplicate Zapper may receive updates which contain new features or that are designed to fix bugs and issues that may arise. All updates are made available from the Mac App Store. To check for updates, open the App Store application on your computer and click the Updates button at the top of the screen as seen below.


Five: Contact Support
Duplicate Zapper Knowledge Base and Support

If you still have questions about using your Duplicate Zapper software and cannot find the answer in this User Manual, please check our Duplicate Zapper Knowledge Base for answers to the most common questions by clicking the link below:
You can also contact our Support Team directly for assistance by completing a support ticket online here:
Comments